frequently asked questions
Q1: Help, I want to make a book, but I am completely overwhelmed and have no idea where to even start!
A1: Okay, first take some deep breaths! I'll give a general overview of my process, just so you can get an idea of what's going on, okay?
As there are multiple steps requiring you to leave your work under a press overnight, I think it's easiest to break the bookmaking process down into "days" and a series of tasks to complete each "day." Obviously, you don't have to do all of this in one go, but I think this is just an easier way of looking at it.
(hint: click each section below to expand it!)
Day One: Brainstorming & Decisions
- What exactly are you wanting to bind: a journal, sketchbook, fanfic, zine, etc?
- Consider what qualities you want your end product to have.
The cool thing about binding your own books is that they can be made to your exact specifications in a way that mass produced objects never could. Do you want a sketchbook made with your favorite kind of watercolor paper? A journal or sketchbook that lies flat? A book printed on pastel purple paper that's easier on the eyes?
You can go even further, like adding pockets and bookmarks or changing the page color of each section to make it easier to flip through. Look at some examples online to get ideas!
Research different types of bindings to see what would work best for your project. Here are some brief examples:
- Coptic bindings are pretty straightforward to make and attractive, so I think they're a good option for a beginner project to see if you want to persue this hobby further. They also lie flat, which is good for things like watercolor sketchbooks (but, as the spine isn't glued, they're a bit wobbly and probably not suitable for mediums like charcoal or graphite).
- Square-Back Bradel bindings have a much more traditional look, with the spine hinge that is characteristic to case bindings (colloquially known as "hardcovers"). This specific variation makes it easier to line everything up properly by using a base piece of paper cut to size, rather than trying to glue all of your cover materials with no guidelines.
- Sewn Board bindings are like a happy medium between both of the previous options. They are bound using Coptic stitches, allowing them to lay flat nicely unlike most case bindings, but their spines aren't open and unglued like a traditional Coptic-style book, which helps them stay together stronger. As you'd expect from the name, the boards are sewn on, rather than glued, and you add the rest of the cover materials on top, which makes it much easier to line everything up.
- Also, if you're making a smaller book (for example, a oneshot fanfic) or zine, the Pamphlet stitch may be helpful. Rather than buying a specialized stapler for zine-making, this is a good alternative for small batches and, by sewing, you won't have to deal with the staples rusting and becoming brittle overtime.
What aesthetic are you going for? What covering materials are you going to use?
- Honestly, this is like my favorite part of the process: picking out cute coordinating covers and endpapers! You can use basically anything, but there are a few things to keep in mind:
- It's best to cover the spine at least with bookcloth, because paper can easily rip or get worn out with use. You can buy large sheets of bookcloth online for pretty cheap or SeaLemon has a tutorial for making your own.
- I'd also recommend trying to stick with papers that are around cardstock thickness, if possible. Thinner papers may rip more easily or wrinkle when you apply glue. Feel free to experiment with all sorts of different mediums, though! Like, I've used origami paper, the brown packing paper (kraft paper), wrapping paper, scrapbook paper, etc, and I've even seen people online using things like wallpaper, old tablecloths, shampoo bottles, seashells... Go wild!
Day Two: Preparing & Arranging the Insides
Books (or the books we're concerned with today, at least) are broken up into a series of roughly equal-sized segments, referred to variously as sections, signatures, gatherings, etc. For the purposes of this guide, I'll be using "signatures," but be aware that other resources may have a different way of referring to the same thing.
The process of setting up your signatures is obviously going to be different based on what sort of project you're doing. If you're just making a blank book or sketchbook, you're basically home free. Otherwise, you'll need to compile your pages in a way that lets you bind them (this process is called imposition). Assuming you already have a fully typeset pdf, I'd recommend using momijizukamori's Bookbinder.js app to impose your document. It has lots of options, including paper size, signature size, and various formats like quartos, octavos, and other funky things going down to sixty pages per sheet.
Also, if you need help with typesetting, ArmoredSuperHeavy has a tutorial of how to do it in Microsoft Word, and they provide links to other tutorials using different programs. (Again, I think it's useful to look at examples of books you already have or others' work online to get ideas!)
Once your signatures are properly imposed and printed out, you can start folding them and poking the holes needed to bind them. Again, the number and arrangement of holes depends on personal preference and the specific project you're doing. Some sewing methods require an odd number of holes and some need an even number, so, again, it's important to know what you're doing ahead of time.
There are different methods of poking the holes: punching cradles (or a makeshift punch cradle using an old phone book) are pretty popular, and sometimes people use a saw to cut all the holes at once, etc. Personally, I align everything using a piece of cardstock that I marked the measurements on and stab the holes at an angle over a spare piece of cardboard, like DAS Bookbinding showed in a video once, but try out some different things to see what works for you.
- Then, leave your signatures under weight overnight to get them to lay flatter.
Day Three: Sewing & Lining the Spine
Again, the specifics depend on your chosen project. Common methods of sewing together a bookblock include: supported methods (where you sew around cloth tapes or cords) or unsupported methods (where you either only connect signatures with a kettle stitch at either end or linked stitches, like Coptic or French Link).
It's also important to remember to attach your endpapers. Most people recommend simply tipping them onto the first and last signature, but I prefer sewing them in. Besides that, there are many different types of endpaper constructions – DAS Bookbinding has a playlist describing their basic function and some variations.
Next, comes gluing up the spine (unless you're making a Coptic-style book, where this step is unnecessary). Put the bookblock under weight again, then glue the spine using acid-free PVA and line it. Traditionally, when lining the spine, you should use something called "mull," which is a netty fabric, but personally I've been using strips of old newspapers. You just need some kind of thin paper or fabric.
- Then, leave the bookblock under weight overnight to dry.
Day Four: Making & Attaching the Case
- Just continue following the specific steps of your chosen tutorial. This day will generally involve gluing together your cover materials (boards, spine stiffener, bookcloth, decorative paper (optional)) and attaching them to the bookblock, via your endpapers.
- It's very tricky to get everything to line up perfectly and, if you're using PVA glue, it dries so fast that you only have one shot at it – attempting to separate the endpapers and cover will just make a horrible, unsalvageable mess of both! People recommend using wheat paste, a mixture of PVA and wheat paste, or adding some methyl cellulose to PVA to make it dry slower. Otherwise, it's one of those things that you get better at with time and practice…
- Again, when you're done, once again leave the book under weight overnight to dry. (Resist the urge to open it prematurely! You can and will ruin the endpapers and make them all wrinkly! Learn from my mistakes!)
Hope that breakdown is helpful!
Q2: Alright, that sounds reasonably managable. But what supplies will I need to get started??
A2: It's actually pretty easy to use supplies that you likely already have laying around the house to see if you like bookbinding to begin with before trying to get more serious, like sewing thread and a needle, a push pin for poking holes, any old paper, cardboard for covers, etc. If you wanted to step up from those simple supplies, though, I'd recommend:
- a book awl (for poking holes)
- waxed linen thread (or linen thread and beeswax, separately)
- a bone folder
- acid-free PVA glue (SeaLemon has a video comparing different types and brands of glue)
- a large paint brush (for spreading glue evenly)
- leather / upholstery hooked needles (optional, but they make your life much easier!)
- chipboard, grey board, Davey board, etc
You can easily find most of these supplies compiled in bookbinding kits online and they tend to be cheaper than trying to get everything separately. I bought mine from Amazon for $13USD.
There are lots of other big supplies, like book presses, sewing frames, laying presses, guillotine cutters, etc, but they aren't really necessary for every project. I've been getting by just fine setting a stack of textbooks on top of my books while they dry and manually holding everything in place as I sew. If you want to start getting into more advanced techniques, like leatherwork or rounded spines, then that's when you'll start to need more specialized tools. You can find DIYs or get arounds pretty easily on r/bookbinding, though.
Q3a: Everyone's talking about "grain direction" and how important it is... What does that mean?
A2a: Okay, so, paper is made of fibers and, generally, these fibers are like long tubes (except in the case of some specialty papers). Ideally, the spine of the book (where you fold) should be parallel to the paper's grain direction. See diagrams below:
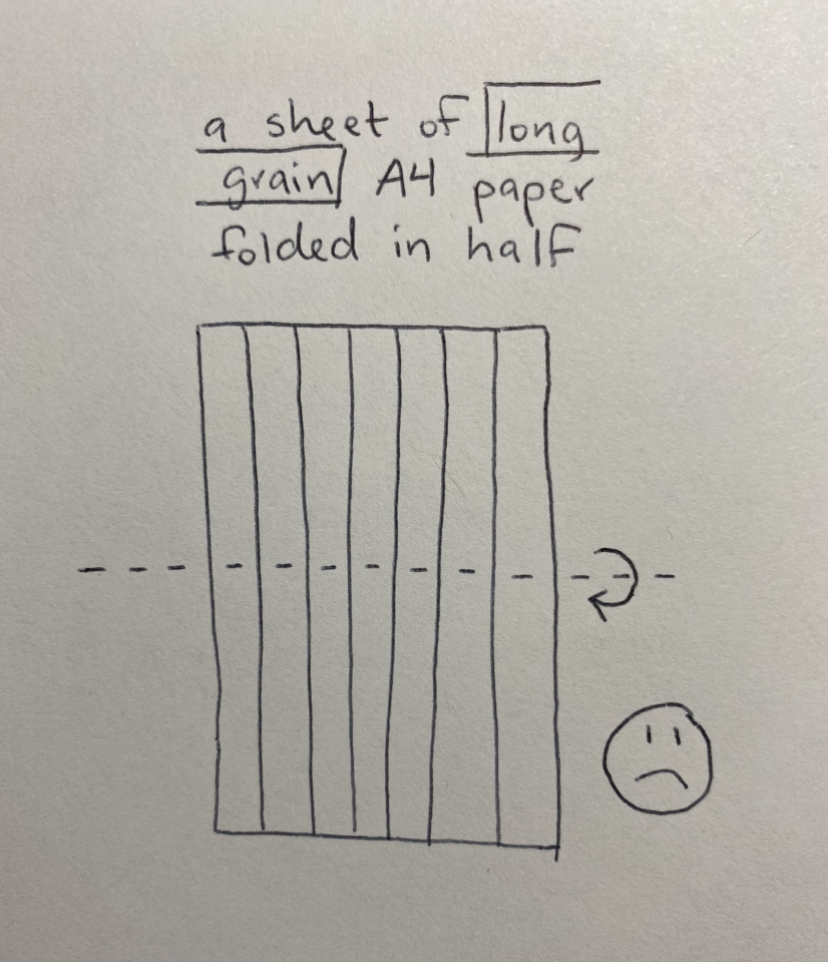
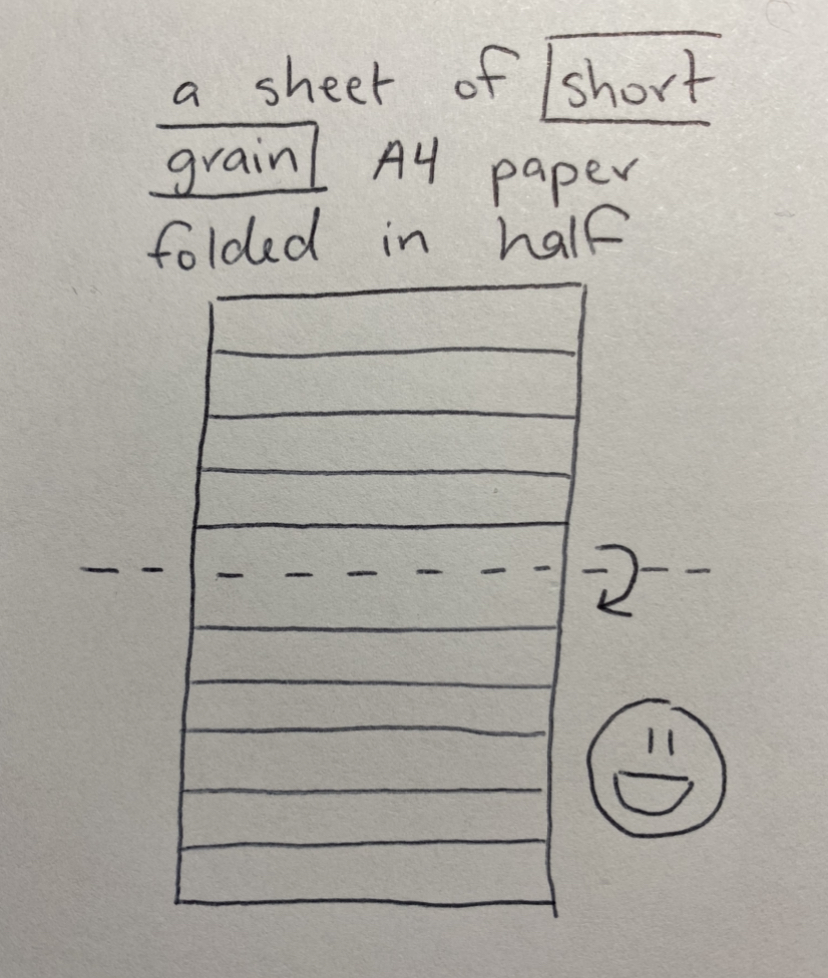
We want the grain direction of our paper (and other materials) to be parallel to the spine because, when exposed to moisture, it expands. If the pages are sewn in with the incorrect grain direction, the fibers aren't able to expand properly, which leads to the pages becoming distorted.
Q3b: So, how can you tell what the grain direction is?
A3b: DAS Bookbinding has a good article explaining various ways, including seeing which way the paper folds easiest, tearing off a small piece and seeing which side is straightest, and wetting the end of a strip and seeing how it curls. You can basically use the same methods to determine the grain direction of your boards, as well (which should also be parallel to the spine).
If your paper is already bound somehow (ie, in a pad or spiral), it's particularly easy to tell: the paper will already be parallel to the spine. So, if you have, for example, a top-bound sketchbook, you can just fold those in half hamburger-wise and everything will be fine.
Q3c: But how important is it actually for the grain direction to be facing the right way?
A3c: This may be blasphemous to say, but... it depends.
Obviously, if possible, you should strive for all your materials to have the grain direction running parallel to the spine. This is what everyone says. It's the principle rule!
But, frankly... you can buy a ream (500 sheets) of normal long-grain letter-size printer paper for like $10 at almost any store. If you want short grain paper, though, it has to be specially ordered online and for a premium price. For example, Talas, a major bookbinding supply company, has a listing of specialty short grain paper and a ream costs $75! And it's not even guaranteed that your home printer will actually even be able to print on it without constantly jamming! Is that worth it??
Possible solutions include:
- buying 11" x 17" paper and cutting it in half to make short grain 8.5" x 11" paper,
- or using long grain 8.5" x 11" paper, but folding it in quarters to make 4.25" x 5.5" pages,
- or buying A4-sized top-bound notepads (like Rhodia, for example) and folding them in half to make A5-sized books,
- or, *gasp* just sucking it up and having a buckled 5.5" x 8" book.
It doesn't really mess with the function of the book (unless you're making something that will be regularly exposed to a lot of moisture, like a watercolor sketchbook), so while, yes, the buckling is a bit unsightly and it may technically be "incorrect," it's not really that big a deal.
Q4: Please help, I can't get my pages to line up properly when folding! My book has uneven edges!
A4: Yes, that happens. DAS Bookbinding has a couple videos on how to nicely trim a textblock without a guillotine or anything, but personally, I can't get them to work. Just a horrible jagged mess, an absolute massacre...
Instead, I use a fairly small number of sheets per signature (my usual is six or eight pages) and just live with the stepped edges. They aren't that bad and add a bit of character to your book. I don't think it's worth it to fight with them. You won't win...
These were just the first couple of questions I could think of that I wanted to know when I first got started or that seem to show up often on the Bookbinding subreddit. Feel free to leave more in my guestbook or email me if any come to mind, though!